고정 헤더 영역
상세 컨텐츠
본문

Reflex로 쉽고 빠르게 프론트엔드 앱 UI 구성하기
현대의 웹 애플리케이션 개발에서 가장 중요한 요소 중 하나는 사용자가 직관적이고 편리하게 이용할 수 있는 UI를 설계하는 것입니다. 하지만, 이를 처음부터 설계하고 구현하는 데는 많은 시간과 노력이 필요합니다. 저는 파이썬 개발자로서, Web application관련 언어들에 대해서 잘 알지 못합니다.
Reflex는 이러한 문제를 Python으로 해결하기 위한 강력한 도구로, 특히 AI를 활용해 리액트 기반의 현대적인 UI를 간편하게 구성할 수 있는 기능을 제공합니다. 이번 글에서는 Reflex를 사용하여 프론트엔드 앱 UI를 구성하고, 커스터마이징하며, 배포하는 방법을 단계별로 소개하겠습니다. 저는 저를 소개하는 포트폴리오 웹사이트를 간단하게 구성해볼 예정입니다.
github: reflex-dev/reflex: 🕸️ Web apps in pure Python 🐍
GitHub - reflex-dev/reflex: 🕸️ Web apps in pure Python 🐍
🕸️ Web apps in pure Python 🐍. Contribute to reflex-dev/reflex development by creating an account on GitHub.
github.com
1. Reflex의 AI로 프론트엔드 앱 UI 구성하기
Reflex는 AI 기반의 프론트엔드 UI 생성 도구로, 간단한 입력만으로도 애플리케이션 UI를 자동으로 생성해줍니다. FlexGen을 사용하면 텍스트 기반 입력을 통해 원하는 UI의 구조와 레이아웃을 정의할 수 있습니다.
간단한 예시:
- 프롬프트 입력: 사용자는 앱의 목적과 필요한 구성 요소를 설명하는 텍스트를 입력합니다.
Design a sleek, modern, and minimalist portfolio website for a software engineer specializing in AI and deep learning. The website should feature a clean dark mode design as the default theme, with the following sections: Home: An introductory section with a professional photo, a brief bio, and links to social media (e.g., LinkedIn, GitHub). About Me: A detailed section showcasing expertise, professional journey, and key achievements, including projects like OpenVINO™ Training Extensions and any significant research contributions. Projects: A portfolio section to display projects, categorized by type (e.g., AI frameworks, tools, research), each with a description, key features, technologies used, and links to GitHub repositories or demo pages. Blog: A blog section to share articles, tutorials, or updates on recent projects and AI trends. Contact: A contact form with fields for name, email, and message, along with clickable links for email and social media.- AI 생성: Reflex는 입력된 설명을 기반으로 기본적인 UI를 자동 생성합니다.
- 작업 추가 버튼, 작업 목록, 완료된 작업 섹션 등.
- 결과 확인: 생성된 UI는 미리보기로 확인할 수 있으며, 필요에 따라 추가적인 프롬프트 입력으로 UI구성을 수정할 수 있습니다. 또한 생성된 코드를 제공하여 이를 바탕으로 작업을 시작할 수 있습니다.
Reflex의 AI 기능은 UI 구성에서 반복 작업을 줄이고, 초기 레이아웃을 빠르게 생성하는 데 탁월합니다.
2. 용도에 맞게 커스터마이징 하기
Reflex는 생성된 UI를 코드 레벨에서 커스터마이징할 수 있는 유연성을 제공합니다. 기본적으로 Python을 기반으로 한 코드 구조를 가지고 있어, Python 사용자라면 쉽게 적응할 수 있습니다. 아래의 documentation을 참고하세요.
Introduction
The frontend is built declaratively using Reflex components. Components are compiled down to JS and served to the users browser, therefore: Only use Reflex components, vars, and var operations when building your UI. Any other logic should be put in your St
reflex.dev
- 순수 Python 사용: JavaScript나 다른 언어를 배울 필요 없이, 모든 것을 Python으로 작성할 수 있습니다.
- 쉬운 학습 곡선: 웹 개발 경험이 없어도 몇 분 만에 앱을 구축하고 공유할 수 있습니다.
- 유연성과 확장성: 소규모 데이터 과학 앱부터 대규모 다중 페이지 웹사이트까지 다양한 애플리케이션을 구축할 수 있습니다. 이 사이트 전체도 Reflex로 구축되고 배포되었습니다.
- 포괄적인 기능 제공: 사용자 인터페이스, 서버 측 로직, 배포까지 모두 Reflex로 처리할 수 있어 추가 도구가 필요 없습니다.
사용 예시:
- 설치:
pip install reflex - 세팅:
reflex init - 코드 작성 후 로컬 실행:
reflex run
3. 손쉽게 배포하기
Reflex는 개발된 애플리케이션을 배포하는 과정도 간소화합니다. 다음은 배포 과정을 간단히 요약한 것입니다:
- 간단한 정적 페이지만으로 이루어진 경우: -> github pages를 추천합니다.
아래의 deploy.yml을 사용하여 github actions를 통해 pages를 자동으로 배포할 수 있게 할 수 있습니다.name: Deploy to GitHub Pages on: push: branches: [ "main" ] workflow_dispatch: permissions: contents: read pages: write id-token: write jobs: deploy: environment: name: github-pages url: ${{ steps.deployment.outputs.page_url }} runs-on: ubuntu-latest steps: - name: Checkout uses: actions/checkout@v4 - name: Set up Python uses: actions/setup-python@v4 with: python-version: '3.11' - name: Install dependencies run: | python -m pip install --upgrade pip pip install reflex - name: Build project run: | reflex export --frontend-only --no-zip - name: Upload artifact uses: actions/upload-pages-artifact@v3 with: path: '.web/_static' - name: Deploy to GitHub Pages id: deployment uses: actions/deploy-pages@v4
- 동적 페이지로 이루어지는 경우 (이벤트 처리 및 백엔드 기능이 필요한 경우)
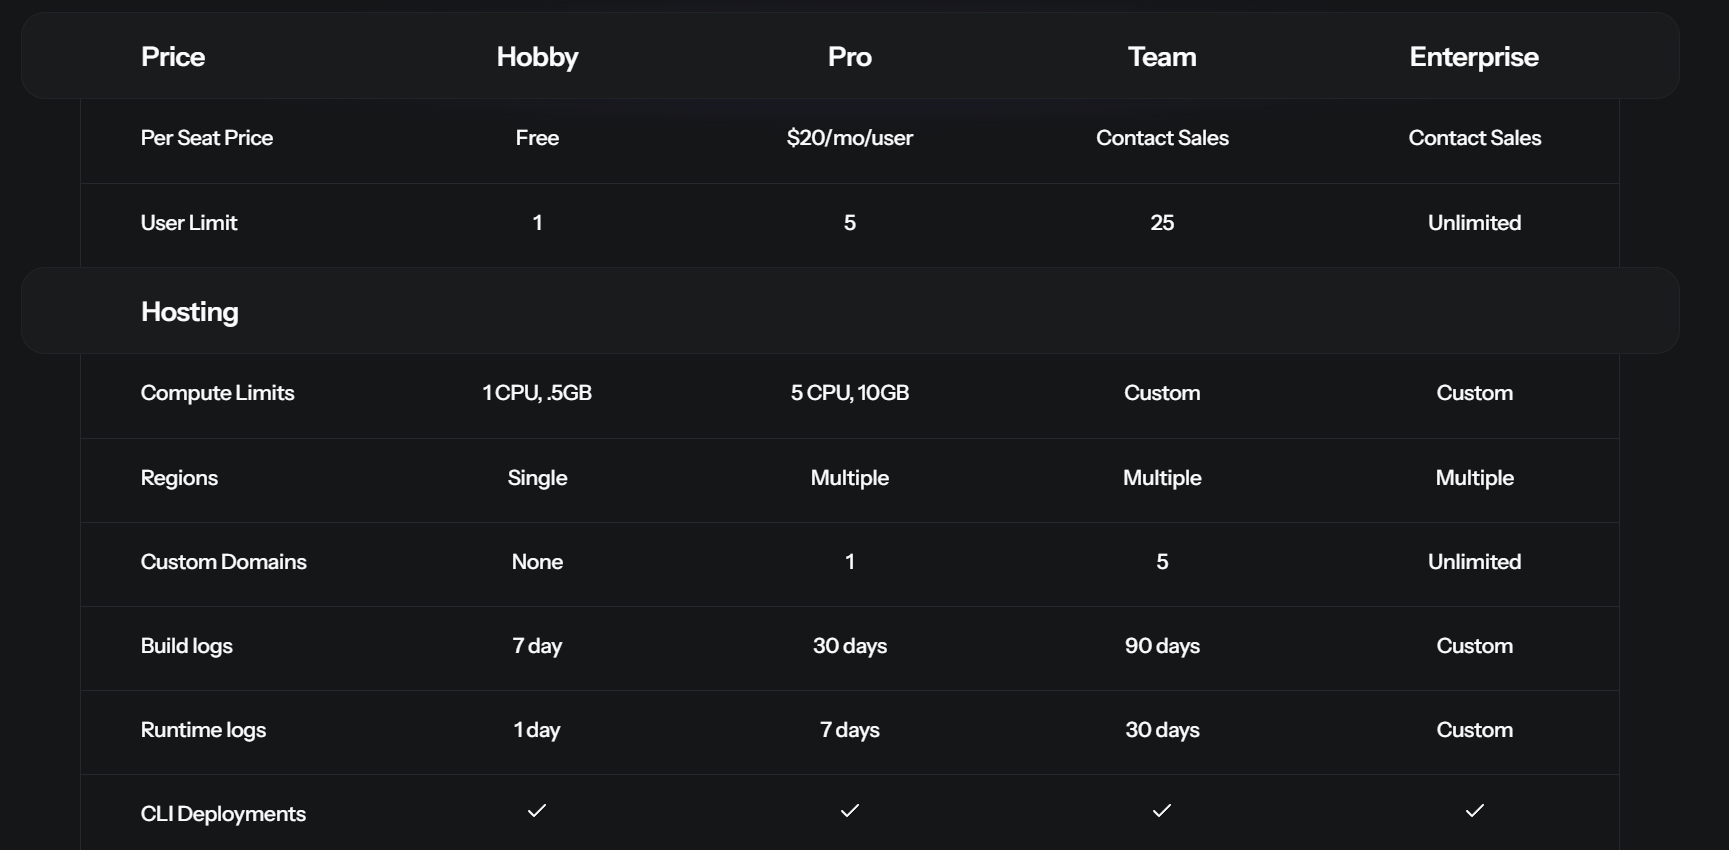
Reflex에서는 cloud 배포 서비스를 제공합니다. 1개의 앱을 배포 가능한 무료 플랜을 사용하여 사이트를 호스팅할 수 있습니다.
https://reflex.dev/pricing/
Reflex · Web apps in Pure Python
The open-source framework to build and deploy web apps using Python.
reflex.dev
- 사용 방법:
- github or google 계정으로 가입/로그인을 하면, project 단위로 cloud.reflex.dev에서 관리를 할 수 있습니다.
- reflex login 을 실행하면 터미널을 통해 계정에 접근합니다.
- 작업중인 app path (reflex run이 실행되는 위치)에서 reflex deploy --project ********** (각 계정별 프로젝트에서 제공되는 명령어) 를 실행하면 배포가 완료됩니다.
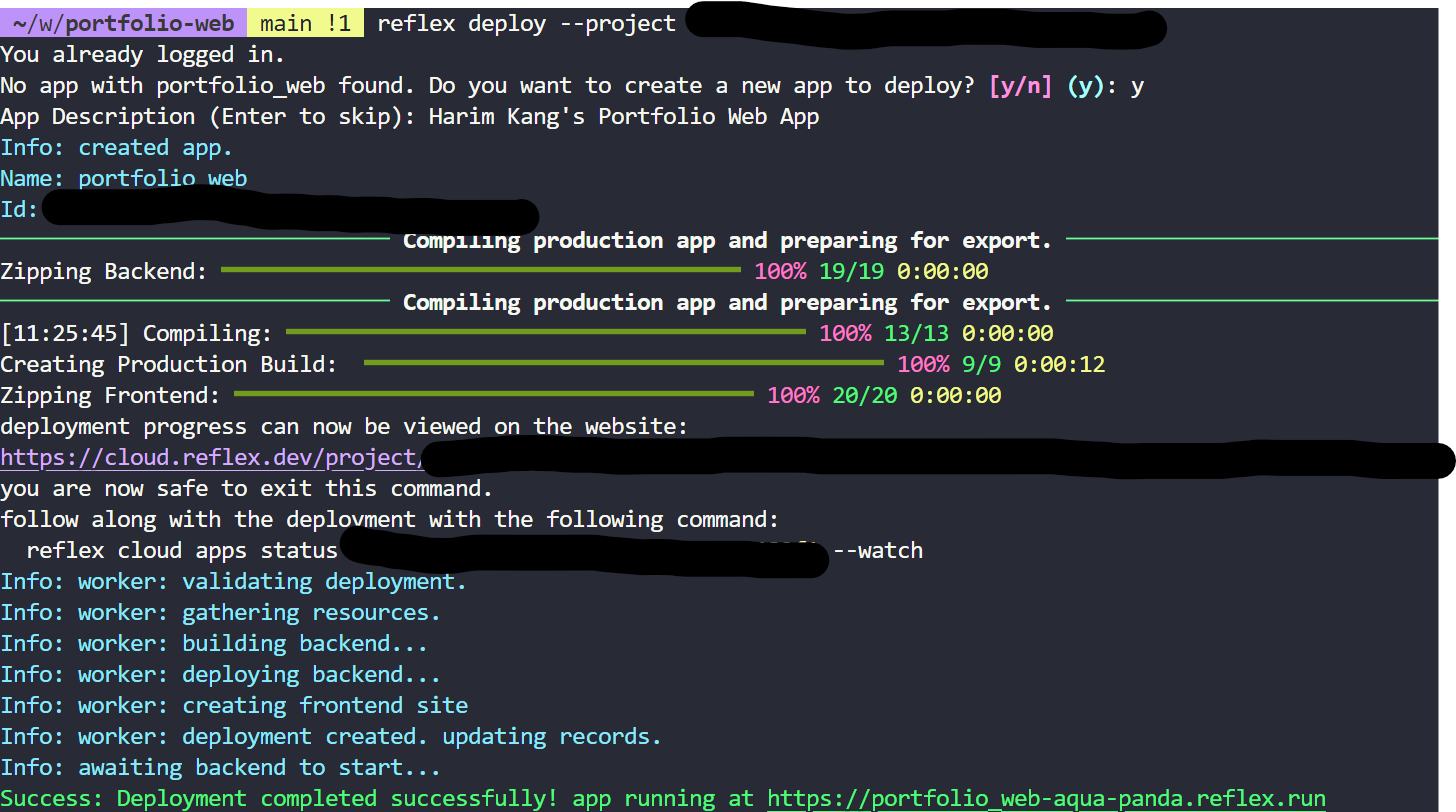
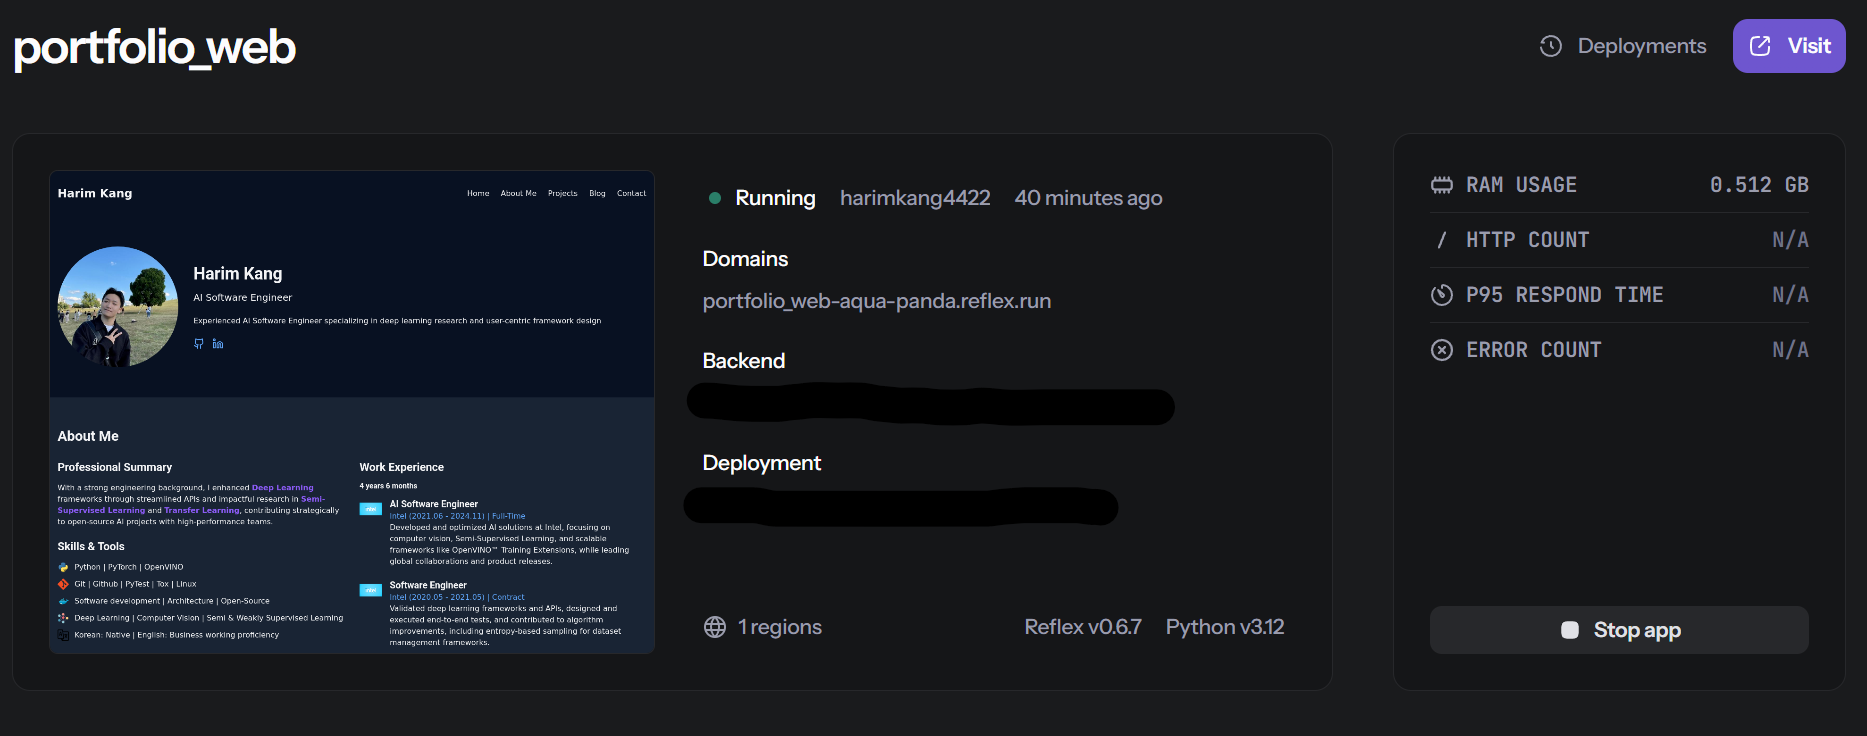
배포 후:
배포된 애플리케이션은 Reflex의 모니터링 기능을 통해 상태를 확인하고, 실시간으로 문제를 해결할 수 있습니다.
결론
Reflex는 AI를 활용한 UI 생성, 유연한 커스터마이징, 간편한 배포 기능을 제공하여 개발자의 시간을 절약하고 생산성을 극대화합니다. 특히, Python 사용자라면 손쉽게 익숙해질 수 있는 문법과 구조를 제공하므로, 처음 시작하는 사람들도 쉽게 접근할 수 있습니다.
저는 포트폴리오 웹사이트를 만들어서 배포까지 수행해봤습니다. 손쉽고 간편해서 자신의 포트폴리오 또는 간단한 데모 페이지를 만들기 좋을거 같습니다.
직접 Reflex를 사용해보고, 여러분의 애플리케이션 개발 속도를 한 단계 높여보세요! Reflex의 더 많은 가능성을 탐구해보고 싶다면 공식 웹사이트를 방문해보세요.
반응형
'Portfolio > Profile' 카테고리의 다른 글
| [Git-Hub] 깃허브 Profile 만들기 & 꾸미기 (7) | 2020.10.06 |
|---|


