고정 헤더 영역
상세 컨텐츠
본문
openCV 스트리밍 화면에 다양한 기능 추가하기
- Streaming Cam View
- 줌(Zoom) in & out
- Touch Based Zoom
- Image Capture
- Video Recording
Writer : Harim Kang
오늘의 목표
해당 포스팅은 openCV를 통해 카메라의 화면을 가져와서 보여주고, 줌 인(Zoom-in), 줌 아웃(Zoom-out) 기능을 추가하고, 화면 터치 이벤트를 이용한 줌 기능 활용을 코드로 작성해보고자 합니다. 해당 코드들은 python 코드로 작성하였습니다.
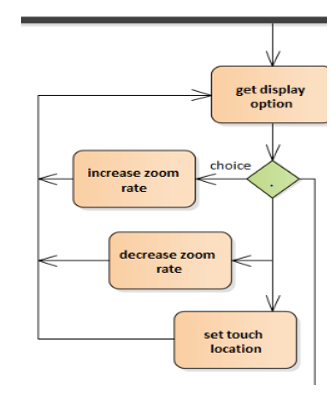
Activity Diagram에서 포스팅과 관련된 부분은 위의 그림과 같습니다.
openCV 스트리밍 화면 만들기
우선 먼저, openCV를 사용하여 실시간 스트리밍 화면을 보여주는 코드를 작성합니다.
import cv2


class Camera:
    def __init__(self, mirror=False):
        self.data = None
        self.cam = cv2.VideoCapture(0)

        self.WIDTH = 640
        self.HEIGHT = 480

        self.center_x = self.WIDTH / 2
        self.center_y = self.HEIGHT / 2
        self.touched_zoom = False

        self.scale = 1
        self.__setup()

        self.recording = False

        self.mirror = mirror

    def __setup(self):
        self.cam.set(cv2.CAP_PROP_FRAME_WIDTH, self.WIDTH)
        self.cam.set(cv2.CAP_PROP_FRAME_HEIGHT, self.HEIGHT)
        time.sleep(2)

    def stream(self):
        # streaming thread 함수
        def streaming():
            # 실제 thread 되는 함수
            self.ret = True
            while self.ret:
                self.ret, np_image = self.cam.read()
                if np_image is None:
                    continue
                if self.mirror:
                    # 거울 모드 시 좌우 반전
                    np_image = cv2.flip(np_image, 1)
                self.data = np_image
                k = cv2.waitKey(1)
                if k == ord('q'):
                    self.release()
                    break

        Thread(target=streaming).start()

    def show(self):
        while True:
            frame = self.data
            if frame is not None:
                cv2.imshow('Davinci AI', frame)
            key = cv2.waitKey(1)
            if key == ord('q'):
                # q : close
                self.release()
                cv2.destroyAllWindows()
                break

    def release(self):
        self.cam.release()
        cv2.destroyAllWindows()


if __name__ == '__main__':
    cam = Camera(mirror=True)
    cam.stream()
    cam.show()
저는 openCV에서 제공되는 method들을 통해 개인 카메라의 스트리밍 화면을 송출하는 Camera클래스를 작성하였습니다. 해당 코드를 실행하면, 단순하게 사용자 컴퓨터에 연결된 카메라의 영상을 보여줍니다.
저는 여기에 기본적인 줌(Zoom) 기능, 터치 이벤트를 통한 줌(Zoom) 기능을 넣고자 합니다.
기본적인 Zoom 기능 추가하기
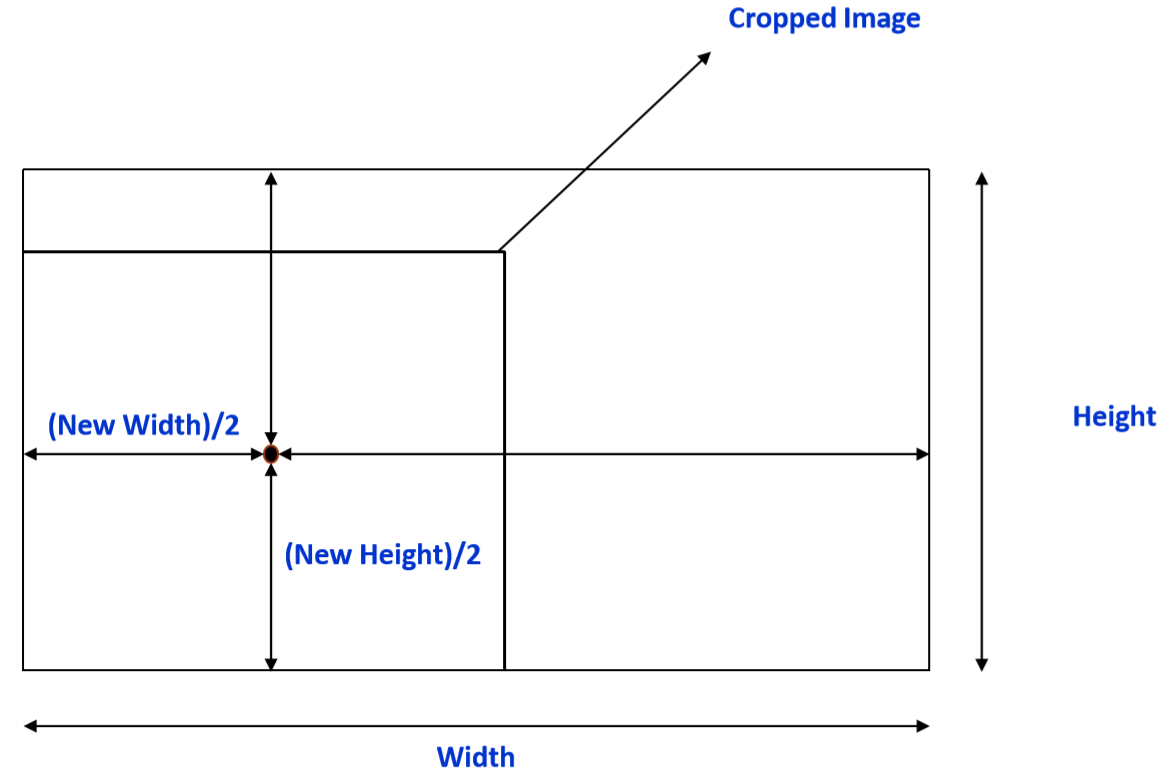
우선, 코드를 작성하기 전에 그림으로 쉽게 표현해 보겠습니다. 저희는 터치 이벤트를 통해서 줌 기능을 구현할 예정이기 때문에, 이를 고려하여 작성하였습니다.
동그라미는 터치된 위치를 의미하며, 위치를 기준으로 위아래, 양옆의 크기를 살펴서 작은 부분을 새로운 frame의 절반으로 생각하여 새로운 사이즈의 frame을 찾아서 잘라내는 작업입니다.
이제는 기본적인 줌(Zoom)기능을 담당하는 코드를 작성해보겠습니다. openCV는 줌과 관련된 method를 제공해주지 않는 걸로 알고 있어서 저는 scale이라는 배수를 의미하는 변수에 맞게 화면을 잘라서 크기를 조정해서 화면에 보여주는 형태의 코드를 작성하였습니다.
    def __zoom(self, img, center=None):
        # zoom하는 실제 함수
        height, width = img.shape[:2]
        if center is None:
            #   중심값이 초기값일 때의 계산
            center_x = int(width / 2)
            center_y = int(height / 2)
            radius_x, radius_y = int(width / 2), int(height / 2)
        else:
            #   특정 위치 지정시 계산
            center_x, center_y = center

            center_x, center_y = int(center_x), int(center_y)
            left_x, right_x = center_x, int(width - center_x)
            up_y, down_y = int(height - center_y), center_y
            radius_x = min(left_x, right_x)
            radius_y = min(up_y, down_y)

        # 실제 zoom 코드
        radius_x, radius_y = int(self.scale * radius_x), int(self.scale * radius_y)

        # size 계산
        min_x, max_x = center_x - radius_x, center_x + radius_x
        min_y, max_y = center_y - radius_y, center_y + radius_y

        # size에 맞춰 이미지를 자른다
        cropped = img[min_y:max_y, min_x:max_x]
        # 원래 사이즈로 늘려서 리턴
        new_cropped = cv2.resize(cropped, (width, height))

        return new_cropped
코드는 center라는 터치한 위치를 주었을 때와 그냥 zoom기능을 사용했을 경우 두가지로 나누어서 if, else문을 구분하였습니다. image의 크기를 받아서 중심값을 찾아내고, scale에 맞게 크기를 계산하여 그에 맞춰 crop 하고, 이를 원래 사이즈로 늘려서 return 하는 순서로 작성하였습니다.
    def touch_init(self):
        self.center_x = self.WIDTH / 2
        self.center_y = self.HEIGHT / 2
        self.touched_zoom = False
        self.scale = 1

    def zoom_out(self):
        # scale 값을 조정하여 zoom-out
        if self.scale < 1:
            self.scale += 0.1
        if self.scale == 1:
            self.center_x = self.WIDTH
            self.center_y = self.HEIGHT
            self.touched_zoom = False

    def zoom_in(self):
        # scale 값을 조정하여 zoom-in
        if self.scale > 0.2:
            self.scale -= 0.1

    def zoom(self, num):
        if num == 0:
            self.zoom_in()
        elif num == 1:
            self.zoom_out()
        elif num == 2:
            self.touch_init()
zoom in과 out 기능은 scale값을 조정하여 기능을 하도록 코드를 구성하였습니다.
    if self.touched_zoom:
        np_image = self.__zoom(np_image, (self.center_x, self.center_y))
    else:
        if not self.scale == 1:
            np_image = self.__zoom(np_image)
stream 메소드 중간(self.data = np_image) 코드 이전에 위의 코드를 넣어서 터치에 의한 줌 기능이 이미 실행되고 있는지, 아니면 기본적인 줌 기능이 실행되는지를 확인하여 줌 기능을 수행합니다.
Touch - Event에 의한 줌 기능 추가하기
    def show(self):
        while True:
            frame = self.data
            if frame is not None:
                cv2.imshow('Davinci AI', frame)
                cv2.setMouseCallback('Davinci AI', self.mouse_callback)
            key = cv2.waitKey(1)
            if key == ord('q'):
                # q : close
                self.release()
                cv2.destroyAllWindows()
                break
    def mouse_callback(self, event, x, y, flag, param):
        if event == cv2.EVENT_LBUTTONDBLCLK:
            self.get_location(x, y)
            self.zoom_in()
        elif event == cv2.EVENT_RBUTTONDOWN:
            self.zoom_out()
위의 코드 중에 show 함수에 cv2.setMouseCallback('Davinci AI', self.mouse_callback) 코드를 추가해 주었습니다. 해당 코드는 self.mouse_callback 이라는 함수를 화면에서 터치 이벤트를 처리하는 함수로 지정한다는 의미입니다.
아래의 mouse_callback함수는 터치 이벤트를 처리하는 함수로서, 해당 코드에서는 왼쪽 마우스 더블클릭시에 zoom_in이 되도록, 오른쪽 마우스 더블 클릭 시에 zoom_out이 되도록 구성하였습니다.

문제점 발생!
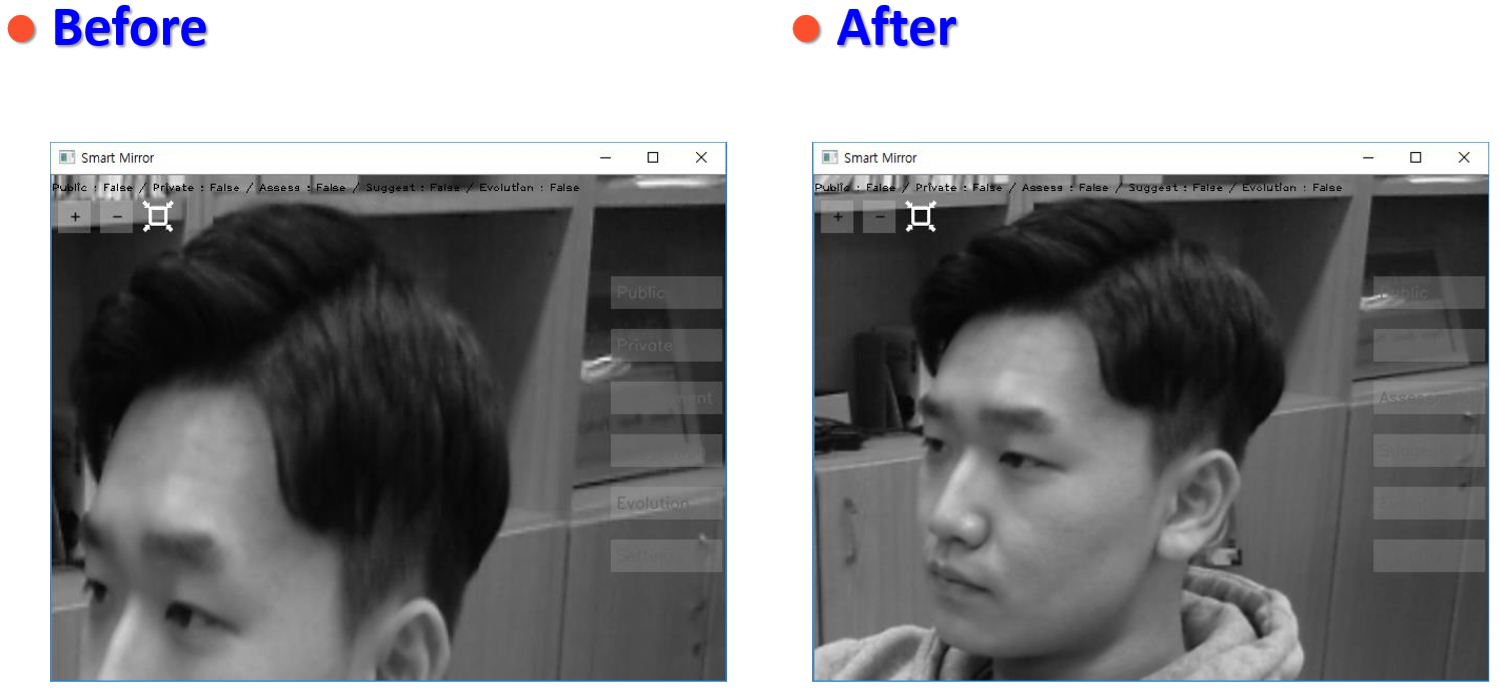
가장자리에서의 터치 줌일 수록 화면이 일그러지거나, 너무 갑작스럽게 확대되는 경향이 생겨서 이를 비율에 맞게 터치 줌이 되도록 수정하고자 합니다.
아래의 그림과 같이 가장자리 부분의 터치 이벤트 시, 일그러짐 현상을 방지하기 위해 특정 비율에 맞춰서 터치 위치를 조정하는 방법입니다. 적당한 비율을 유지하면서 확대를 가능하게 합니다.
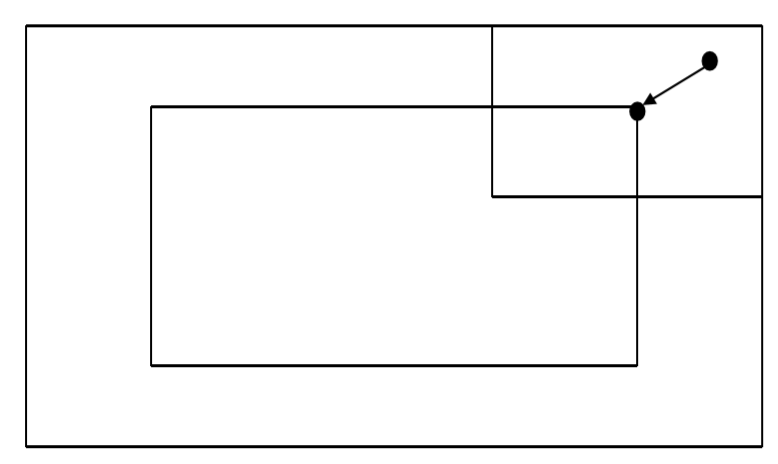
위의 그림을 코드로 나타내면 아래와 같습니다.
    def __zoom(self, img, center=None):
        # zoom하는 실제 함수
        height, width = img.shape[:2]
        if center is None:
            #   중심값이 초기값일 때의 계산
            center_x = int(width / 2)
            center_y = int(height / 2)
            radius_x, radius_y = int(width / 2), int(height / 2)
        else:
            #   특정 위치 지정시 계산
            rate = height / width
            center_x, center_y = center

            #   비율 범위에 맞게 중심값 계산
            if center_x < width * (1-rate):
                center_x = width * (1-rate)
            elif center_x > width * rate:
                center_x = width * rate
            if center_y < height * (1-rate):
                center_y = height * (1-rate)
            elif center_y > height * rate:
                center_y = height * rate

            center_x, center_y = int(center_x), int(center_y)
            left_x, right_x = center_x, int(width - center_x)
            up_y, down_y = int(height - center_y), center_y
            radius_x = min(left_x, right_x)
            radius_y = min(up_y, down_y)

        # 실제 zoom 코드
        radius_x, radius_y = int(self.scale * radius_x), int(self.scale * radius_y)

        # size 계산
        min_x, max_x = center_x - radius_x, center_x + radius_x
        min_y, max_y = center_y - radius_y, center_y + radius_y

        # size에 맞춰 이미지를 자른다
        cropped = img[min_y:max_y, min_x:max_x]
        # 원래 사이즈로 늘려서 리턴
        new_cropped = cv2.resize(cropped, (width, height))

        return new_cropped
zoom 기능을 담당하는 __zoom 함수에 비율 범위에 맞게 중심값 계산을 하는 코드를 추가하였습니다.
그 외의 추가적인 기능들
추가적으로 현재 image를 캡쳐하여 저장하는 기능과 동영상 녹화 기능을 추가하고자 합니다.
    def save_picture(self):
        # 이미지 저장하는 함수
        ret, img = self.cam.read()
        if ret:
            now = datetime.datetime.now()
            date = now.strftime('%Y%m%d')
            hour = now.strftime('%H%M%S')
            user_id = '00001'
            filename = './images/cvui_{}_{}_{}.png'.format(date, hour, user_id)
            cv2.imwrite(filename, img)
            self.image_queue.put_nowait(filename)
먼저 이미지 캡쳐 함수입니다. images란 폴더를 먼저 만드셔야 합니다.
    def record_video(self):
        # 동영상 녹화 함수
        fc = 20.0
        record_start_time = time.time()
        now = datetime.datetime.now()
        date = now.strftime('%Y%m%d')
        t = now.strftime('%H')
        num = 1
        filename = 'videos/cvui_{}_{}_{}.avi'.format(date, t, num)
        while os.path.exists(filename):
            num += 1
            filename = 'videos/cvui_{}_{}_{}.avi'.format(date, t, num)
        codec = cv2.VideoWriter_fourcc('D', 'I', 'V', 'X')
        out = cv2.VideoWriter(filename, codec, fc, (int(self.cam.get(3)), int(self.cam.get(4))))
        while self.recording:
            if time.time() - record_start_time >= 600:
                self.record_video()
                break
            ret, frame = self.cam.read()
                        if ret:
                if len(os.listdir('./videos')) >= 100:
                    name = self.video_queue.get()
                    if os.path.exists(name):
                        os.remove(name)
                out.write(frame)
                self.video_queue.put_nowait(filename)
            k = cv2.waitKey(1)
            if k == ord('q'):
                break
그다음은 동영상 녹화 함수입니다. 해당 코드도 videos폴더를 필요로 합니다. 10분 이상의 녹화 시 다른 파일로 저장되도록 코드를 구성하였습니다. 또한 파일이 100개가 넘어가면 지워지도록 큐 관리를 합니다. (파일 용량을 너무 크지 않게 조절하기 위한 방식)
Github
작성된 코드는 아래의 깃허브 저장소에서 확인가능합니다.
https://github.com/harimkang/openCV-with-Zoom
harimkang/openCV-with-Zoom
This code adds camera streaming, zooming, image capturing, and video recording using openCV. - harimkang/openCV-with-Zoom
github.com
'IT > Toy-Project' 카테고리의 다른 글
| 실시간 Style Transfer 프로젝트 (0) | 2020.09.25 |
|---|---|
| 딥러닝 프로젝트 - Time Series Data Prediction (Matlab, LSTM) (0) | 2020.01.07 |


댓글 영역